Longtion-autorun-pro-8-0-40-260-full-version -

The primary appeal of AutoRun Pro lies in its accessibility. The software utilizes a . Users can select from a variety of objects—such as buttons, images, and text boxes—and place them on a canvas to build a custom front-end for their CD, DVD, or USB flash drive.

: Organizing manuals and PDF files into a searchable interface. longtion-autorun-pro-8-0-40-260-full-version

: Projects can often be completed in minutes by substituting placeholder content in existing form templates. The primary appeal of AutoRun Pro lies in its accessibility

While the standard AutoRun Pro is robust, Longtion also offers an version. The Enterprise edition functions as a full Rapid Application Development (RAD) tool, capable of creating more complex interactive multimedia applications that go beyond simple autorun menus. Version 8.0.4.260 is often sought as a "Full Version" to unlock the complete library of templates and the ability to publish projects without watermarks or trial limitations. Practical Applications AutoRun Pro is most commonly used for: : Organizing manuals and PDF files into a

: Supports the seamless inclusion of video, audio, and high-resolution images to create immersive presentations.

: Features like SplashScreen support, password protection (SecurityFormSettings), and expiry settings allow for professional-grade project management. Enterprise and Version Differences

is a comprehensive visual tool designed for the rapid development of professional autorun (autoplay) interfaces for optical media and portable storage. Developed by Longtion Software , this specific version represents a refined iteration of their "What You See Is What You Get" (WYSIWYG) design philosophy, allowing users to create complex interactive menus without writing a single line of code. Core Functionality and Design Philosophy

Using IP Camera Viewer

This section explains how to perform basic operations like adding or editing a camera.


longtion-autorun-pro-8-0-40-260-full-version


  • Adding a Camera: The first step to setup your video security system is to add your camera. IP Camera Viewer allows you to work with both IP Cameras and Webcams. There are a few ways to add a camera:

    • On Toolbar, click on Add Camera icon.

    • From Camera Menu, click on Add Camera.

    • On Manage Cameras, click Add Camera.

    • Use shortcut key Ctrl + N.

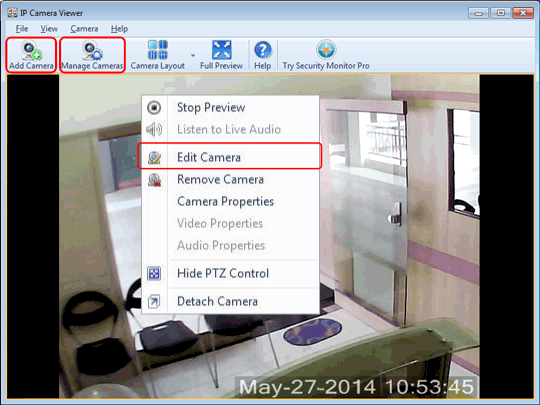
  • Editing Camera: To update the camera settings, select Edit Camera. For IP Camera, refer: Edit IP Camera page. For Webcam, refer: Edit Webcam page. Here are the different ways to edit a camera:

  • Manage Cameras: A control that allows you to view camera status and perform basic tasks such as Add, Edit or Remove cameras. Use shortcut key Ctrl + G.

  • Change Camera Properties: Adjust your Camera's image, video or audio properties.